Life in Ideas
Christmas Village Display on a Narrow Console Table
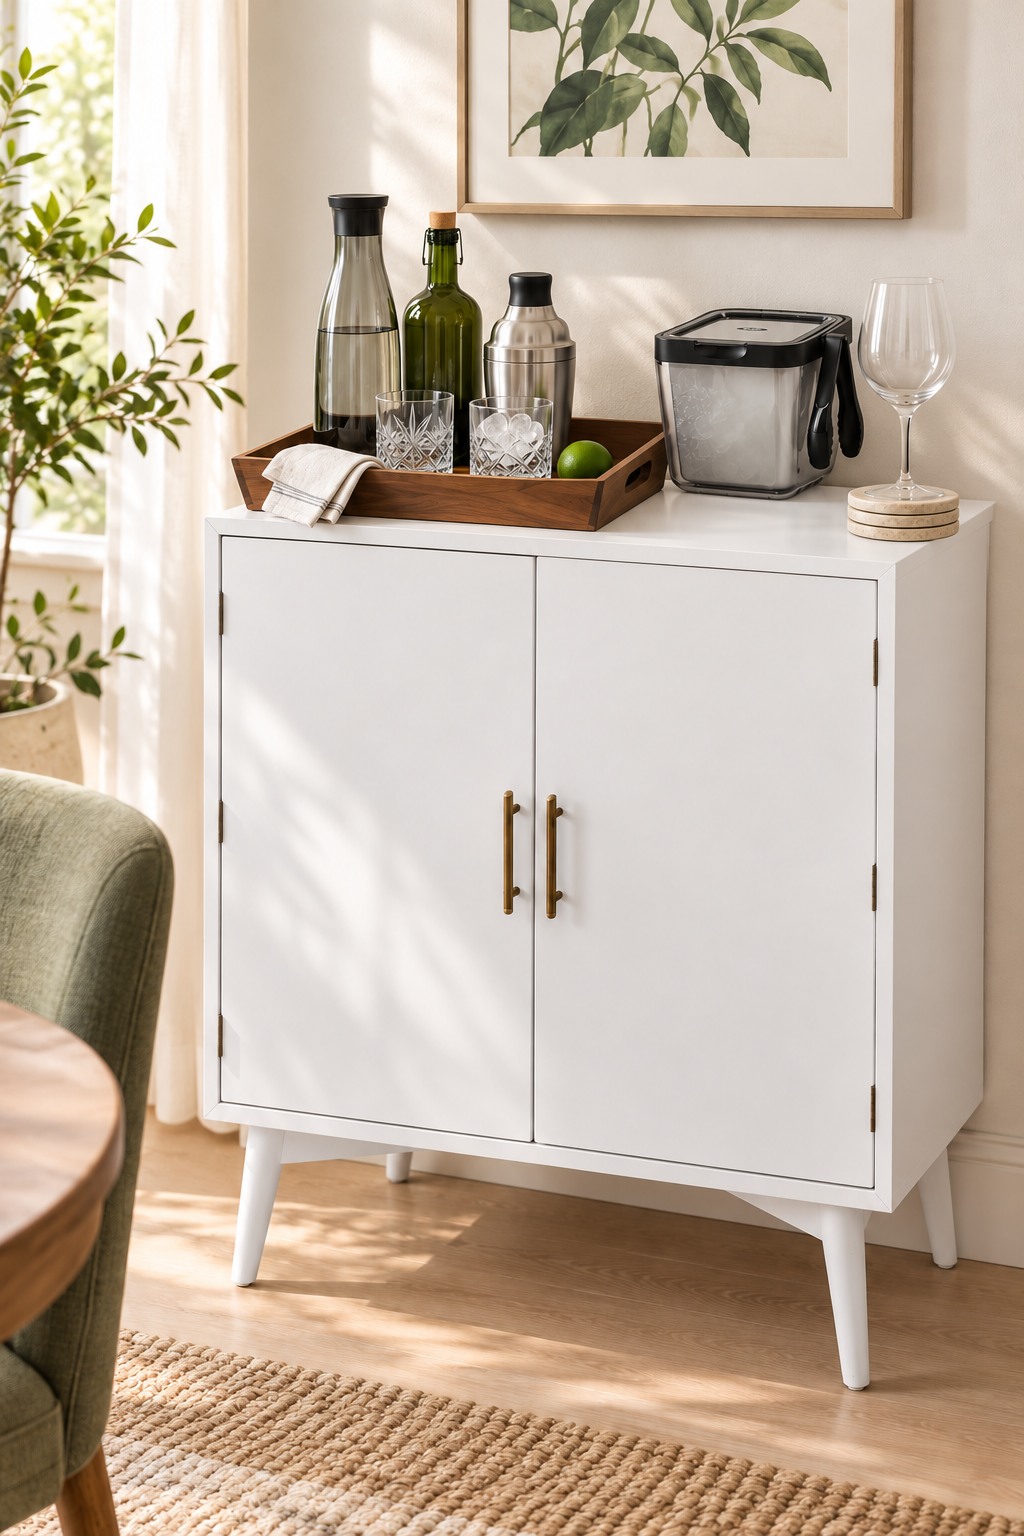
A Christmas village can make a narrow console feel festive and still leave somewhere for the keys. Glowing white houses and frosted trees form a compact scene along this entryway table. Keep the depth and daily landing spot in mind, then borrow the little details that fit the entrance you already use.
Shop the Look

VASMIA Bamboo Console
A slim bamboo table with a 9.44-inch-deep top. Measure the lower shelf before adding baskets.
View on Amazon ↗
DN DECONATION Ceramic Houses
Compact white houses with frosted trees and warm light. Their shallow bases suit a single row along the rear of a console.
View on Amazon ↗
QZYL Cut-to-Fit Snow Blanket
Trim the snow blanket to a narrow strip beneath the houses. Keep it flat so the ceramic bases remain steady.
View on Amazon ↗
Department 56 Frosted Trees
Mix shorter frosted trees between the houses. Leave the tallest pieces out when they overwhelm a compact village.
View on Amazon ↗
HANKOR Oval Key Tray
A shallow 7-by-4-inch dish keeps keys in their own landing spot, separate from the village and snow.
View on Amazon ↗
Sunniry Gold Round Mirror
A round gold frame adds height above the village. Wall-mount it using fixings suitable for your wall.
View on Amazon ↗
Vagusicc Narrow Woven Baskets
Orient the short side front to back on a shallow shelf. Paper-rope baskets keep small dry essentials off the tabletop.
View on Amazon ↗
EXF Warm White Fairy Lights
An optional warm-white strand for the rear edge. Keep its battery box reachable and the wire clear of the key tray.
View on Amazon ↗
Roowest White Wood Risers
An optional low platform for one house. Use a smaller riser only when its full base fits and the front landing zone stays clear.
View on Amazon ↗
Scotch Felt Protection Pads
Small self-stick pads help separate hard décor bases from a finished surface. Keep the base level and switches accessible.
View on Amazon ↗
Command Decorating Clips
Guide an optional light strand along a compatible smooth surface. Follow the mounting and removal directions for your finish.
View on Amazon ↗
IRIS WeatherPro Storage Bins
Store wrapped village pieces after the holidays. Compare the bin’s internal space with the actual packaging before choosing.
View on Amazon ↗As an Amazon Associate I earn from qualifying purchases. Affiliate Disclosure
Plan a Christmas Village for a Shallow Console
A Christmas village display on a console table works best when the buildings form a loose line rather than a deep miniature town. A slim table can hold a charming village without becoming a surface you cannot use. This arrangement keeps white ceramic houses toward the back, adds small green trees between rooflines and reserves a separate spot for keys.
Begin with the table you have. Measure its usable length and depth, including any raised edge or trim. Then measure the largest house base, any attached tree and the space needed to lift the house to reach its light switch. A narrow table calls for a single row; overlapping buildings to imitate a deeper display can hide windows and make the arrangement awkward to handle.
The VASMIA console option has a listed top size of 39.37 inches wide by 9.44 inches deep. The DN DECONATION houses have listed depths of 3.31 to 3.50 inches and heights from 4.02 to 6.18 inches. Those dimensions provide a useful starting point for a shallow arrangement, but check the actual pieces together before cutting the snow base. Keep the whole ceramic base supported.
Leave a Landing Zone for Everyday Keys
Put the key tray in place before adding decorations. On this layout it sits at the right end, where it can be reached without passing a hand over a roof or miniature tree. The HANKOR tray is listed at 7 by 4 inches. Try it with your usual keys and check whether it also needs space for a wallet or sunglasses.
A front strip of visible wood makes the narrow tabletop feel lighter, but it does not all need to become storage. Give the tray its own clear area beside the village. If your entrance regularly collects mail or bags, use an existing drawer or a separate organizer instead of crowding those items into the snow.
Open the entrance door fully and walk past the table before finishing the display. Move the table or shorten the arrangement if a handle, coat or bag can brush against a house. Decorations should not project beyond the edge into the route through the hallway.
Arrange Houses and Trees in a Simple Line
Start with the tallest house slightly to one side of the center. Add a shorter building on each side and vary the gaps, leaving room for a tree between the rooflines. The white finish keeps the group connected while differences in roof shape and height prevent the row from looking rigid.
The ceramic houses already include small frosted trees. Add separate bottlebrush trees only where the display needs another green accent. Choose the shorter trees first; a tall tree can easily dominate houses that are only a few inches high. Leave windows visible from the front and from the direction you enter the room.
Keep this shallow version mostly at tabletop level. A low riser is an option for a console with enough free depth, rather than a required part of the scene. The Roowest set includes smaller platforms around 6.3 and 7.8 inches square; use one only after checking its entire footprint and the remaining landing space. The larger platforms are a poor match for this slim tabletop.
Add Snow Without Covering the Whole Table
Lay the houses out on bare wood first, then cut the snow blanket to follow their shared footprint. Leave the front edge of the table visible and stop the snow before it reaches the key tray. A narrow, irregular strip gives the village a winter setting without turning the entire console into a snowy platform.
Keep the layer thin and even beneath each base. Do not use a mound of loose material to prop up a ceramic house. Where the underside could mark a finished surface, suitable small felt pads can help create separation; place them evenly and avoid covering battery doors, switches or any manufacturer-required openings.
A miniature road is not necessary here. Removing the road and deep background scenery saves depth for the buildings themselves. If you already own a larger village, display a smaller selection on the console and rotate pieces rather than forcing the full collection into a narrow row.
Keep Lighting Controls Easy to Reach
Test every house light before setting out the snow and trees. Check how its switch and battery compartment open, then leave enough room to lift the house without dismantling its neighbors. A quiet evening test also shows whether the windows provide enough light on their own.
If you want an extra glow, run a warm-white light strand along the rear of the group. Keep its battery box at an accessible end, clear of the keys. The EXF option uses AA batteries and has a timer; its battery box should remain indoors and dry. Avoid open flames among the snow material or beneath a wall mirror.
Use decorating clips only on a surface the manufacturer lists as compatible. Smooth finished wood or a suitable smooth wall may work; a textured wall or delicate finish needs separate consideration. Follow the preparation, placement and removal directions, and leave access to the adhesive strip instead of trapping it behind the furniture.
Use the Wall and Lower Shelf for Balance
A wall-mounted round mirror gives the vignette height while leaving the shallow tabletop free. Center it on the console rather than on a single house. Use mounting hardware appropriate to the wall and follow the mirror’s installation instructions; leaning a large mirror behind small houses takes away useful depth.
Use the lower shelf for dry everyday essentials instead of extending the village downward. The Vagusicc baskets have a listed footprint around 11.2 by 6.1 inches. Orient the longer side across the shelf and the shorter side front to back, then measure between the table supports. The top’s depth does not establish the usable depth of its lower shelf.
Leave space around the baskets so you can lift them out easily. Paper-rope baskets suit dry gloves, small bags or similar light items; wet footwear belongs elsewhere. After the holidays, photograph the house arrangement and pack each ceramic piece separately. Keep the original protective packaging when possible, and size storage bins around the wrapped pieces.
Console Table Christmas Village Questions
Can a Christmas village fit on a very narrow table?
Often, yes, if every house base fits fully on the top. Choose compact buildings, use a single row and leave out a road or deep platform. Plan the everyday landing zone before filling the available width.
Do I need a riser for the village?
No. Different house heights can give a shallow arrangement enough variety. A riser is useful only when it fits completely and leaves the buildings steady and the console easy to use.
How do I stop the console from looking cluttered?
Limit the display to a connected group, use a narrow snow base and keep keys in a separate dish. Leave visible wood between the village and the tray, and use the lower shelf for dry everyday storage.
Where should the light switches go?
Leave them accessible at the sides or beneath houses that can be lifted easily. Test lighting before arranging the display and avoid hiding battery boxes under snow or behind furniture you cannot reach.
Explore more Christmas Village Display Ideas or browse Home Decor.